

Spring automates the process of creating objects and binding them together. Spring takes the responsibility of creating instances of classes and binding the instances based on their dependencies. The instances or objects that Spring manages are called beans. But, how Spring manages objects and dependencies, well, Spring requires information about three things:
- Who are the Beans
- Which are the Dependencies
- and the Location of the beans.
So, let’s start with the annotations that provides the information that Spring requires.

@Component
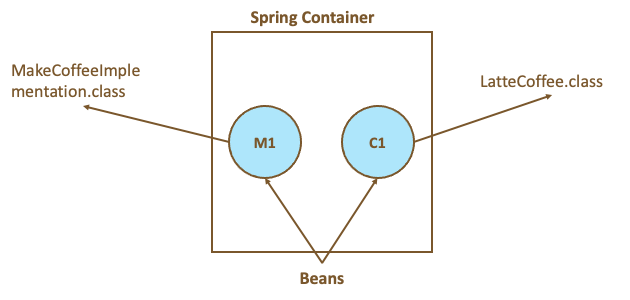
If we want Spring manages and create the objects, we need to tell Spring who are the beans, to do that we need to mark/ add the classes with the annotation @Component, this annotation must be at the beginning of the class and import it from the org.springframework.stereotype package. With this we indicates to Spring who are the beans.
import org.springframework.stereotype.Component;@Component
public class LatteCoffee implements Coffee {
//.. More methods and variables
}
Now the Spring container (IoC) will have two beans, one of the type MakeCoffeeImplementation and other of type LatteCoffee.
@Autowired
Spring need to know which are the dependencies of the beans. Here enters to play the @Autowired annotation, this annotation is used to cover this purpose. First we need to import it from the package org.springframework.beans.factory.annotation. This annotation can be add in several parts but, we will add it in the class fields.
import org.springframework.stereotype.Component;import org.springframework.beans.factory.annotation.Autowired;@Component
public class MakeCoffeeImplementation { @Autowired
private Coffe coffe;
    //.. More methods and variables
}
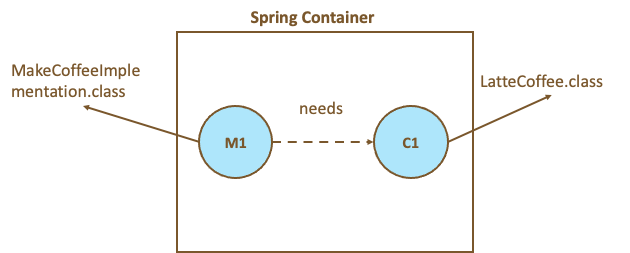
This annotation tells Spring that the bean MakeCoffeeImplementation needs and object of type Coffee. So, we can say Coffee is a dependency of MakeCoffeeImplementation.
@ComponentScan
To give the location of the beans to Spring, we use the annotation @ComponentScan, this annotation has the purpose of tell Spring where to can find the beans and autowire the dependencies required for the beans. This annotation can be used with arguments or without arguments, if we use the arguments we indicate the packages where Spring will find the beans, but, if we use the annotation without arguments, we indicate to Spring that all the beans are in the package and subpackages where the annotation is used.
package com.programmingsquirrell.coffeshopapp;import org.springframework.stereotype.Component;import org.springframework.beans.factory.annotation.Autowired;@Configuration@ComponentScan
public class CoffeShopScanApp { public static void main(String[] args) {
ApplicationContext applicationContext = new AnnotationConfigApplicationContext(SpringComponentScanApp.class);
for (String beanName : applicationContext.getBeanDefinitionNames()) {
System.out.println(beanName);
}
}
}
In the above code, the annotation @ComponentScan tells Spring, that the beans will be in the package com.programmingsquirrell.coffeshopapp and its subpackages.
But, we have another annotation @SpringBootApplication, when we use this annotation causes that we don’t need to use the @ComponentScan annotation.
@SpringBootApplication
@SpringBootApplication annotation tells Spring to scan all the files in the package where the class with this annotation is present. It also scans any sub-packages. The recommendation is to use @SpringBootApplication instead of @ComponentScan.
In the traditional way, the dependency injection, occurs in this way:
MakeCoffeeImplementation makeCoffeeImplementationnew MakeCoffeeImplementationnew LatteCoffee());
Now if we use the @Component, @Autowired, and @SpringBootApplication annotations, the above line becomes redundant as it is automatically done by Spring.
The beans that are created by Spring are managed by the Application Context. So, if we need information about a bean we can get from the Application Context.
Let’s review the below code. To create the Application context we need to use the class SpringApplication and the static method run(), and the result will be assigned to variable appContext ApplicationContext, this creates the Application Context. Then with the getBean() method from appContext variable we are able to get the bean of a particular class, in this case we get the bean MakeCoffeeImplementation and we create a variable named makeCoffee and assign the bean.
public static void main(String[] args) { //Here we create the ApplicationContext that manages the beans and dependencies ApplicationContext appContext = new SpringApplication.run(CoffeShopApp.class);
//Use the ApplicationContext to find which filter is begin used MakeCoffeeImplementation makeCoffee = appContext.getBean(MakeCoffeeImplementation.class); //Prepares the Coffee makeCoffee.prepareCoffee();
}
What I want to explain, instead that the class MakeCoffeeImplementation creates the objects, Spring Application Context does and we only need to pick the bean and use it to execute the prepareCoffee().
This might look complex in the beginning, but consider to use the to have hundred of beans and we need to wire it manually (using the traditional way), this option make the development very easy.
You can download the code and try by yourself here.
Thanks for reading and happy learning!!

Leave a comment